January 1 2009
Nice selection of “The Flying Saucer” flyer/magazine images at alltime favorite Sci-Fi blog, Sci-fi-o-rama. Click HERE to see more. . 


Daily Inspiration 18
Posted by Starlight86 | daily inspiration
Leave Me Comment! Click Here(0) | 10:47 AM
PencilTalk
Posted by Starlight86 | website inspiration
PencilTalk is a must have site for anyone who love pencils. It's my new favourite blog! :)
Check out PencilTalk now.
Leave Me Comment! Click Here(0) | 10:21 AM
Experiment: Circle
Posted by Starlight86 | process
This is not a tutorial, but i consider it as my experiment-process to backup my experimental work in Gimp.
This experiment is based on Fabio Sasso from ABDUZEEDO tutorial called Crazy Cool Vectors in Illustrator and Photoshop.
He has created a tutorial showing how to create that effect using Illustrator and Photoshop. You can see it HERE.
I try to made something like that in Gimp..and this is my result, I know that it does not look exactly as the result in Fabio tutorial,but it's pretty close..:)
1. I have a black background layer and a white circle at the second layer.
Then, at the circle layer i apply Render>Clouds>Different Clouds.I use 4 for the Detail, Randomize and Tileable for the value.
2. Then i duplicate the circle layer. I named it as circle 2. Using the Scale tool, i resize the duplicate layer a bit smaller and i change the layer mode to Screen.
3. Then i just repeat what i did in the previous step to all the other circles.
4. The next step is hide the black background and i merge visible the all the circle layer.
5. Then i create a circle and fill it with black for the color and align it in the center of the other circles.
6. Colorize the circle
I created a new layer above the circle layer and i fill it with some gradient color. Change the Blend Mode to Overlay. Duplicate the circle and i change the layer mode to Screen and position the new group next to the other but let a part of it over the other circle. That will create a nice blend mode to the circle.
Result:
Some other result made by me using the same technique.
I've included the XCF file for you to use. Click HERE to download it.
Leave Me Comment! Click Here(1) | 10:31 AM
Daily Inspiration 17
Posted by Starlight86 | daily inspiration
My daily inspiration for today..:D
December 30
James White- Happy 2009 from Signalnoise!

Yiyinglu Illustration

Little sunshine by *Roinja at Deviantart

Leave Me Comment! Click Here(1) | 1:37 AM
Gimp inspirations: Rosie Hardy
Posted by Starlight86 | daily inspiration, inspiration art, photography
Rosie is one of the best photographers on Flickr. Especially when it comes to self portraits. Rosie Hardy work has become a HUGE inspiration to me and I am sure to most of the people who is using Gimp out there. She is 18 years old, use Canon EOS 400D and GIMP image editor for her work.(yeaapp..she use GIMP!). 
I love Rosie new work called "as if you had a choice". Awesome!
Check out her photostream HERE and her myspace HERE.
Leave Me Comment! Click Here(0) | 10:37 PM
Gimp: Musical Tutorial
Posted by Unknown | gimp tutorials
Hello! I am Amuro. New co-writer of PA Blog. Today i've wite a Gimp tutorial and i wanna share with all of you . I hope u enjoy my post.
This tutorial is inspired by the photoshop tutorial here. Before we get started, let's take a look at the image we'll be creating:
In this tutorial, I will show you how to use some dodge and burn technique in photo manipulation.
Download them:
Stock : Here
Music brush : Here
Texture : Here
1. Now open the stock file. Using Crop tool to take the woman out.
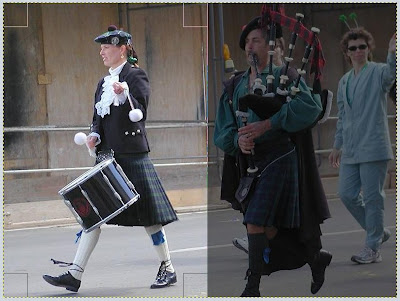
2. From the background layer. Use Blur tool on the her skin part but remember don't blur her eyes and her lips.( this step for soften image effect later)
Use Clone tool, press Ctrl on your keyboard and set the source of clone on the background layer,
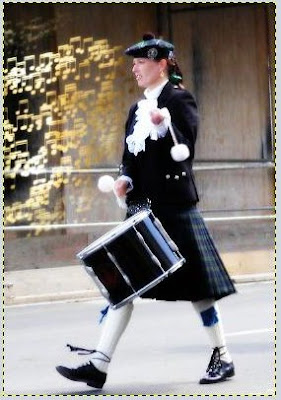
Create new layer with transparency (I now call this layer is the clone layer OK) and clone on the drum to the high left corner like this:
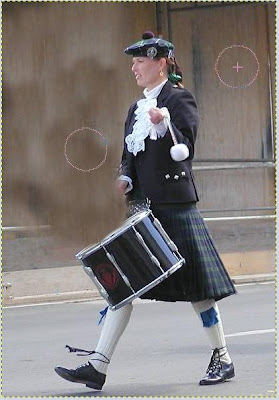
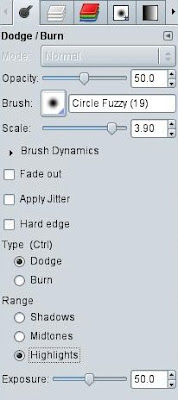
3. Select Dodge/Burn tool and do dodge some part you want it lighter, and burn some part for it darker.
Here my settings for Dodge
And for Burn :
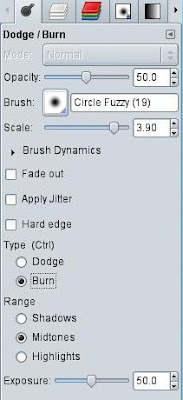
4. After burn and Dodge, i blur some lightest part and here what i got:
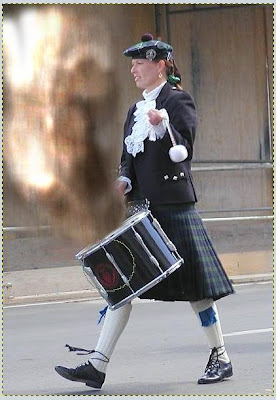
5. Add the layer mask with totaly black for the clone layer.
Change foreground to "White". Chose Painbrush tool and setting like this
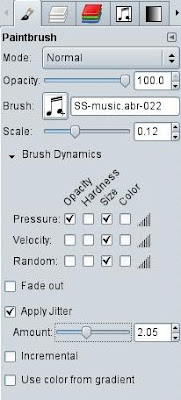
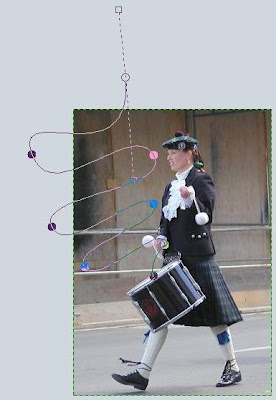
6. Ok, leave all the settings for paintbrush tool like that.
Use the path tool to creat the path from the drum to upper left corner like my path
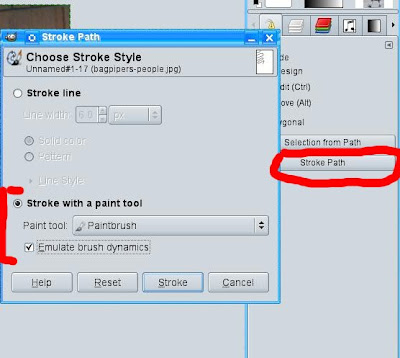
7. Now we need to chose from tool options tab, select stroke path
(You can do this by orther way :
- On the paths tab, select your just creat path
- Right mouse button click on that path to open a menu and select "Stroke Path")
On the stroke path select stroke with a paint tool
Paint tool : Paintbrush
And remember you have to click on "Emulate brush dynamics" if it wasn't clicked.
8. Now select all the layer mask and copy it. Create new transparency layer, select blend tool.
Use Golden gradient.
Shape : i chose Radial but Linear is ok too ^_~
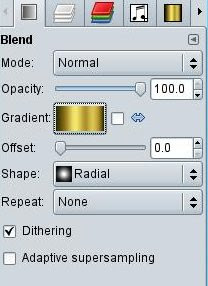
9. From the center of image or where you want do the gradient and set layer mode to "Overlay".
Add layer mask for golden gradient layer. Paste the copyed layer mask on the preview step, and apply it to the layer mask.
(If you want apply the float layer to the layer mask, make sure the layer mask you want to apply is selected. And select the anchor button on the bottom of layer display tab)

Well cause i just want to apply the overlay of golden gradient for the music notes.
10. This step is the effect softly image inspired by Julia Yu from dienanh.net
Now on the layer menu. Select new layer from the visible (you can do the same thing with copy visible and paste as Layer under edit menu)
Duplicate the visible layer you just created. Both layer set mode to "Softlight". Both layer apply the Gaussian Blur (Filter menu -> Blur --> Gaussian Blur...)
The first layer value is 5 for x,y. The duplicated one set to 10 for x,y.
Apply Desaturate under Color menu. to the duplicated one. Remember select "Average". This step is make the duplicated one to black and white. You will get something that look like this :
11. Select the Blend tool (Gradient tool it is). I use "Full saturation spectrum CW" gradient, Shape : Linear
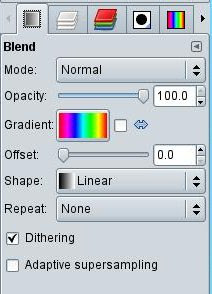
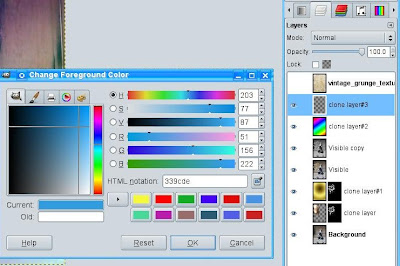
13. Do the gradient from the upper left corner to the bottom right corner. Set layer mode to "Diffiirent" and with Opacity to 20. Create new transparency layer and fill it with color( i use color #339cde) set layer mode to "Softlight" Opacity to 40
14. Now final step is chose Files menu -> Open as Layer and select the texture you had downloaded. I use "vintage_grunge_texture 1.jpg"
Blur -> Gaussian Blur with 5 for x,y, set layer mode to "Softlight" and you will get the image that look like this :
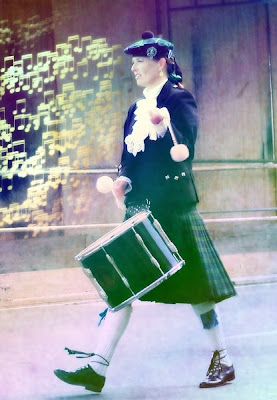
Have Fun with Gimping and Good luck for you.
Happy New Year 2009 too.
Thanks for reading.
~ Amuro Ray VV
Leave Me Comment! Click Here(2) | 12:26 PM
Daily Inspiration 16
Posted by Starlight86 | daily inspiration
Leave Me Comment! Click Here(0) | 9:42 AM
Creating The Light Text Effect in Gimp
Posted by Starlight86 | gimp tutorials
This is a simple tutorial how to create a nice glow light text effect in Gimp and i hope u enjoy it. If u like this tutorial,do leave me some comment. I'll appreciate it..thanks!
In this tutorial, I will show you how to create a light text effect using border options and some gaussian blur.
Open Gimp and create a new document. For this one i'll used 1024 x 768.Fill it with black color.
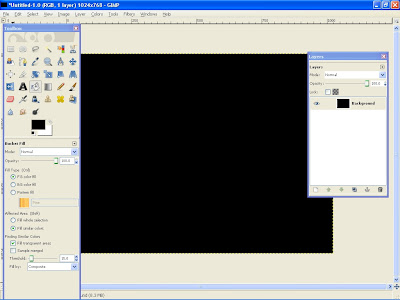
And then create a new layer and i named it as Cloud. Fill it with white. Go to Render>Clouds>Different Clouds. I use 4 for the Detail, Randomize and Tileable. Apply to the layer.

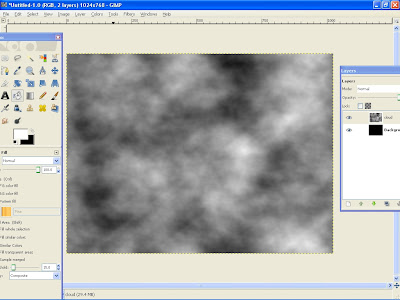
After that changes the layer mod to Overlay. Create another layer and named it gradient.
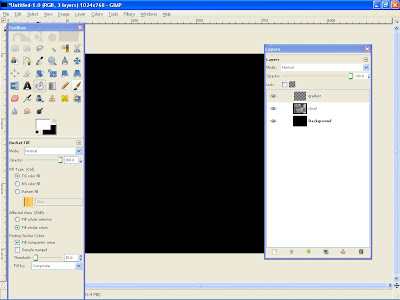
Using the blend tools select German flag smooth gradient color , 100 for the opacity and Linear for the shape. Apply the gradient to the layer.Change the layer mode to overlay.
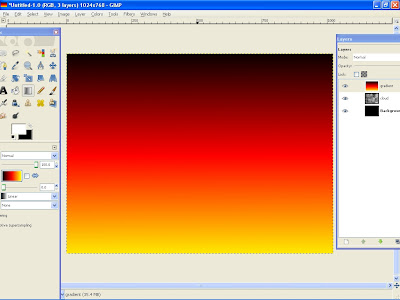
Then create another layer and i named it as color.Fill it with Red color. #ff2b01.

Then change the layer mod to overlay.

Next you need to create some text. Select the Type Tool, and type your text. For me, i type Starlight and the size of the text is 100 px.

Right now we will need to create a new layer behind the text layer because after this we will merge the text to become a resterized layer. Create a new layer.

merge down Starlight text

Right click at the text layer and select alpha to selection.
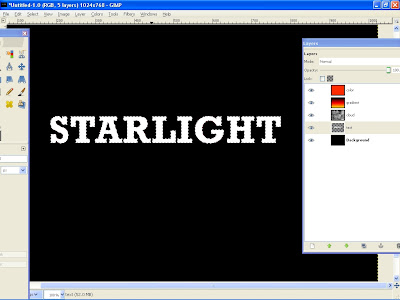
Then go to Select>Border and i use 2 pixels for the value.

Hide the original text layer and create a new layer. Select the new layer and i named it as Starlight layer.
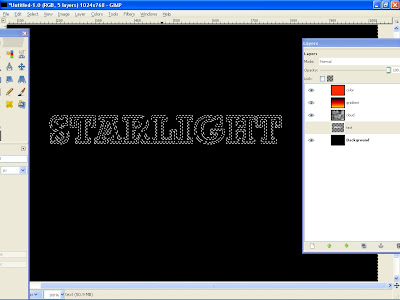
Go to edit> Fill with FG color. (make sure your foreground color is white)

You should get these.

The next step is apply a Gaussian Blur to Starlight layer. Use 2 pixels for the Horizontal and 2 pixels for the Vertical. Click OK. Then apply again the Gaussian blur with the same value. ( Ctrl+F )
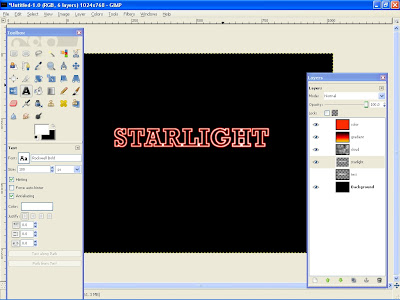
Then duplicate the starlight layer and and then apply again the gaussian blur. Use 5 pixels for the Horizontal and 5 pixels for the Vertical. Click OK.

Create a new layer and named it as light effect.Using the Ellipse tool draw a circle and fill it white color.
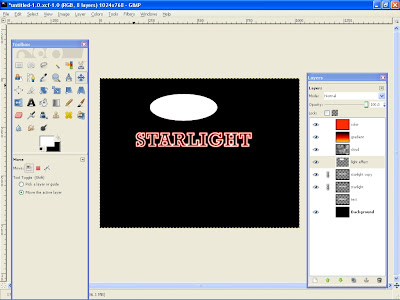
Go to Filters>Blur>Gaussian Blur. Use 90 pixels for the Horizontal and 90 pixels for the Vertical. Click OK.

Placed the light effect anywhere u like. I put it above the Starlight text. Then change the layer to Overlay.

Now i'll add some color to the black background. Create a new layer above the background layer and behind the text layer. Select blend tool,Use Red color , 100 for the opacity and radial for the shape. Apply the blend tool to the layer. Then low the layer opacity to 50.

Then add some depth to the design. Fill it with black and change the layer mode to overlay.

Final result ( Click to large view )
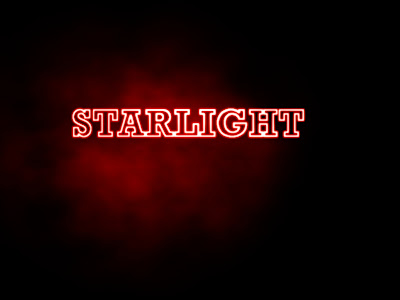
I also included the Xcf file.
Click here to download the Xcf file used for this tutorial
Leave Me Comment! Click Here(6) | 5:09 AM

