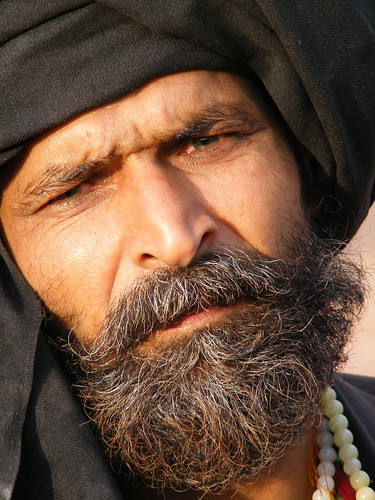
Following my series of Gimp tutorials, I will show you how to add HDR-like effect to a normal potrait picture in Gimp. I used a photo of a man that I found on sxc.hu. If you like this tutorial, leave a comment and i hope you enjoy it. Cheers!! :)
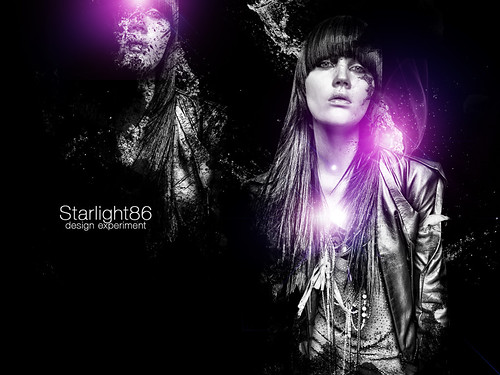
Before we start this tutorial,let's take a look at the original image and the final image below:
Original image:
Final Result:
In this tutorial I will show you my technique to add HDR-like effect to a normal potrait photo. The technique used some basic Gimp filter like Unsharp Mask and Neon, and also playing with layer mode.
Note: For this tutorial, you need to download the image HERE. I'm using Gimp 2.6 for this tutorial. So without further ado here is the tutorial:
1. Open the image in Gimp
2. Duplicate the layer. Next, go to Filters > Enhance > Unsharp Mask.
3. I use 45.0 for the Radius, 1.50 for the Amount amd 0 for the Threshold.
4. Renamed the layer as "unsharpmask".
5. Duplicate the "unsharpmask" layer. I'll name this one as "overlay unsharpmask".
6. Next, at the "overlay unsharpmask" layer, I'll add a layer mask.
7. Fill the layer mask with black color.
8. Select the Brush tool. Select Circle Fuzzy brush, Scale= 10.0 and low the opacity of the brush to 50.0.
9. Set the Foreground Color to White and begin painting directly on the Layer Mask. You're looking to paint over all the areas where there are highlights. To strengthen things like the wrinkles, you should paint light next to the dark but not over it.
10. Next, duplicate "unsharpmask" layer and renamed it as "neon".
11. Put the "neon" layer above all layer.
12. Next, go to Filters > Edge Detect > Neon.
13. I use 6.0 for the radius and 0 for the amount.
14. Change the "neon" layer mode to Screen.
15. For final adjustment, duplicate the neon layer and low the opacity to 50.
A mini-documentary about color. Created by Eduardo Morais, narrated by Joana Vieira da Costa. This video has won a number of awards - Ovarvideo 2005 Jury Prize, FEST 2006 Audience Award for Best Documentary, Tom De Video ACERT 2007 Best Documentary, Arouca Film Fest 2007 Best Documentary - and was present at a number of important events including the Vila do Conde International Short Film Festival 2006, Videoevento Turin 2005 and Jovens Criadores 2006.
This is a really nice Gimp video about creating brush in Gimp by Jackson. Have a look and don't forget to visit Jackson Youtube channel for more Gimp tutorials.
I’ve been experimenting with hdr effect lately and as a result, I found a very nice photoshop plugin program called Redynamix,adds HDR-like effects to single images. The GUI is easy to understand, with immediate previews for settings. Unfortunately Redynamix available for Windows version only.
P/s: If you dont have photoshop, this plugin also work with IrfanView (free graphic viewer). Redynamix plugin cost $16, and you can try the trial version HERE.
A while back there was a post about the Daft Punk page, that, with certain clicks on the keyboard, made sounds from the Better, Faster song. Well I came across a new page like that one a few days ago. Its called "Drum Set." Its pretty cool, and with a sequence of presses on the keyboard, you can actually make a real sounding song! The link to the site is http://www.ronwinter.tv/drums.html. Check it out, and see what you come up with!
Have you ever installed a brush you just downloaded, and had to restart Gimp to see it in the list? Me too. I install many brush all the time, (while I have my Gimp open) and it’s not only annoying, but a waste of time to have to restart the entire application, just to see the new brush that you just installed. You can avoid restarting if you click "Refresh Brushes" in the Palette options of the Brushes Dialog after you install your new brush.
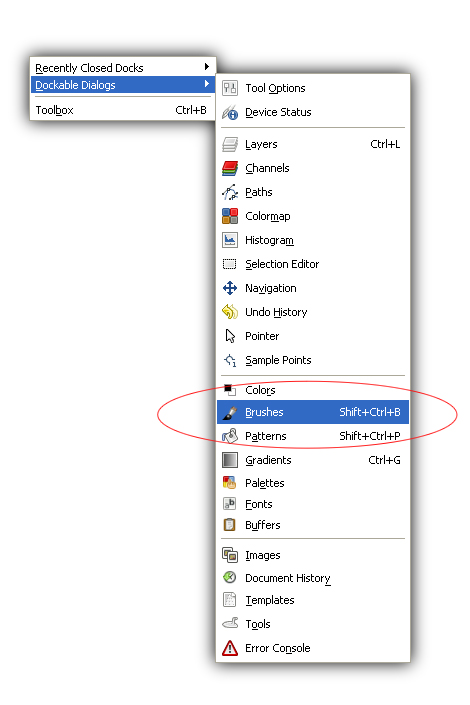
How do i show my Brush dialogs?
Just go to Windows> Dockable Dialogs > Brushes.
p/s: This is a very quick Gimp tips that will hopefully save you some time in the long run. I’m sure this is a priceless one if its new to you. :)
The new commercial for Samsung Pixon utilizes a lovable fun mascot on a road trip with a bunch of guys to show you that ‘Life does not wait.’ Found via tvadfad.
Really diggin’ these amazing work by Bulgarian designer, Kliment Kalchev. Kliment uses a fruity gradient in his logo and accompanying illustrations to set a playful yet serious mood. You can check the rest of his work HERE and HERE. Found via designerfeedr.
I discovered Jonathan Haggard aka skryingbreath work through his deviantart account and immediately become his fan. Jonathan’s work speaks for itself. I love the vibe of his propaganda poster. For even more inspiration visit Jonathan's website, and also his Deviant Art page.
I’d love to purchase Wacom Intous 4 for my work unfortunately I don’t have $500. Anyways, has anyone had any experience with this Wacom stuff? Any thoughts? Drop me a comment. :)
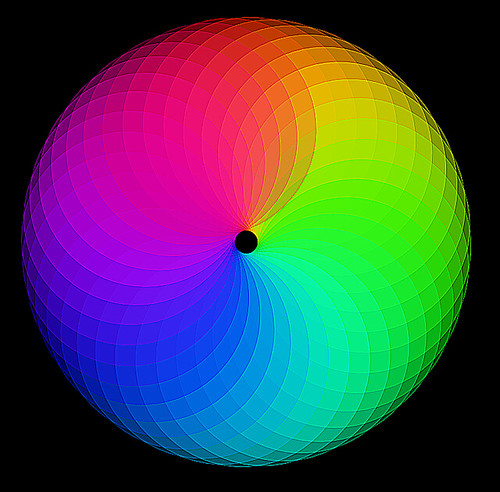
Some experiment i did in Inkscape today and i wanna share with all of you guy. I'll show some easy step how to create the full spectrum circle in Inkscape, and also explain how to polish it in Gimp.Check it out.
Inkscape is a Vector Graphics Editor, similar to Adobe Illustrator, that strives to be SVG Compliant, open source, responsive and extensible.
Below is my result and I'm happy with it.
CREATING THE FULL SPECTRUM CIRCLE IN INKSCAPE.
1. Create circle in Inkscape 2.Select“unset” fill by right-clicking on the fill color.Low the opacity to 40.
3.Select the circle and click on it again. You will see the rotation mark. Drag the rotation of the center downward the circle.
4.Go to Edit > Clone > Created Tiled Clone.
5.Tiled Clones Value
6.Click the create button and you will have a full spectrum circle!
7.Create a black rectangle and put it behind the spectrum circle. Save the image.
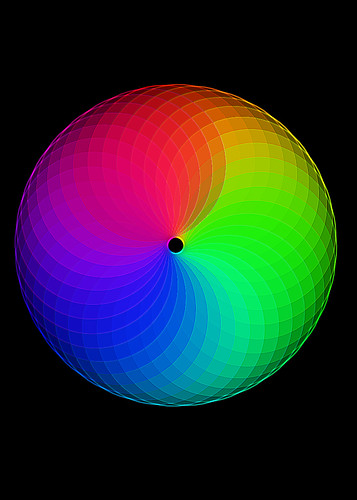
POLISHING THE FULL SPECTRUM CIRCLE IN GIMP.
Import the full spectrum circle image in Gimp
Go to Filters> Enhance > Unsharp Mask. I use 0.1 for the radius,6.0 for the amount and O for threshold value.
Next, duplicate the layer
Go to Filters> Enhance > Sharpen.
I use 40 for the values. Then flatten the image. Finish.
Result in Gimp
POLISHING THE FULL SPECTRUM CIRCLE IN PHOTOSHOP.
This is my other experiment. Using Photoshop.
Process 1 Import the spectrum circle image in potoshop