Today i've decided to write a Gimp tutorial inspired by a photoshop tutorial called Really Cool Eclipse Effect in Photoshop at Abduzeedo site. It's one of my favorite tutorial and one of the coolest photoshop tutorial i've seen..I'll use some techniques from that tutorial and some other technique from my previous tutorials. I hope you like this one and let me know guys what do you think.
P/s: Btw the design also inspired by the amazing work of James White. I'm a huge fan of James work. I'm sure that pretty much everyone of you guys loves the art of James White too.
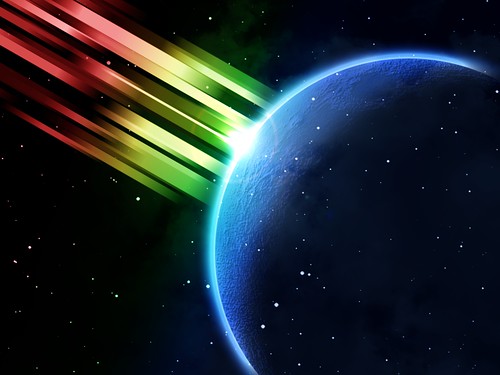
Before we get started, let's take a look at the image we'll be creating

In this tutorial you will learn how to create a brush, playing with layer mode and use brush dynamic option, and also basic of layer mask.
STEP 1: CREATING THE BRUSH
Open Gimp and create a new document. For this one i'll used 1024 x 768.Fill it with black color and with the Rectangle Select Tool, create a selection like the image below.

Fill it with gray.

Now go to Image> Crop to Selection.

Go to Select > All.

Image> Flatten Image

Then, go to Image > Mode > Grayscale

Save it at your Gimp folder. I'm using windows so i'll save it at C:\Program Files\GIMP-2.0\share\gimp\2.0\brushes (default location where i installed my Gimp). Don't forget to renamed the extension to .gbr.
As u can see I save it as mybrush.gbr (but you can named it whatever you like).Click the image for larger view.

Then select Done.

p/s: You must refresh the brush tool, go to the Brushes dialog and hit the Refresh button or you just restart Gimp.
STEP 2: ADDING SOME ELEMENT.
Now create a new document. I use 1024x768.Fill the background with blackcolour.

Here I decided to use a photo of a moon. Click HERE to get the image. Drag the image to Gimp.

Using the Flip tool, we will flip horizontal the moon and change the layer mode to Screen. Move it a bit to the right.

Create a new layer. I'll named it as color. For the colors use: #064096(Dark Blue)

Fill the layer with the color. Change the layer mod to Overlay.

Now let's add some elements. Here I decided to get a photo of star instead of creting one, that could easily be done too, for the stars I used an image I found online that also being used in other tutorial in abduzeedo, here is the original source.http://www.aavso.org/observing/programs/hen/archive/050410-dss-finder.jpg. Click HERE to download it. Place the image behind the moon layer in the document.

Then change the layer mode to Hard Light. That will make the stars glow.

Lets keep adding more elements to the design. I took some photos of clouds to use in some designs, you can download them free HERE at Stockvault site.Put it behind the moon picture and above the star layer.

Change the layer mode to Screen and the opacity to 25.

I will hide some part of the clouds using layer mask and this is a good technique. Using the layer mask we do not have to erase some part of the layer because layer mask concept is hidden the layer and by that way we will look more profesional working on layers...So right click at clouds layer and add layer mask. Then pick blend tool and set the gradient color to foreground to background(FG to BG). I'll use color black for foreground and white for background color. Apply the blend tool to our layer mask.

STEP 3 PLAY WITH THE BRUSH
Now we will use our custom brush that we create in STEP 1. Select brush tool,use scale 0.50(for the size brush) and white for the foreground color and black for the background color.
Let's edit our brush, to do that go to the Brush Dynamics option:
For Pressure select Opacity,Hardness
Chose Random select Opacity,Size and Color

Now paint some rectangles.

The last thing here is to repeat this again. Create another layer, paint some brush.

Merge down the layer and named it as shape layer.

Select the shape layer and after that go to Filter>Blur>Motion Blur. Use 90º for the angle and 100 pixels for the Length.


Using the Rotate tool, rotate our shape layer and move it to the top and to the left.

Once again i'll use layer mask to hide some part.
Now add layer mask. Then pick blend tool and set the gradient color to foreground to background(FG to BG). I'll use color black for foreground and white for background color. Apply the blend tool to the layer mask..

You should get this ( Click the image for larger view):

STEP 4 ADDING THE SPECTRUM GRADIENT
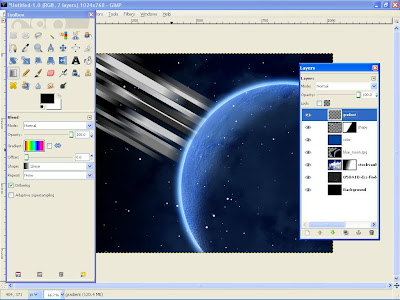
Create another layer and named it gradient.Using the blend tools select Full Saturation Spectrum Gradient , 100 for the opacity and Linear for the shape.

Apply the gradient color.

Change the layer mode to overlay.

Now we will hide some part of the gradient color. To do this add layer mask. Then pick blend tool and set the gradient color to foreground to background(FG to BG). I'll use color black for foreground and white for background color. Apply the blend tool to our layer mask.

Apply the gradient to our layer mask.

STEP 5: ADDING LENS FLARE
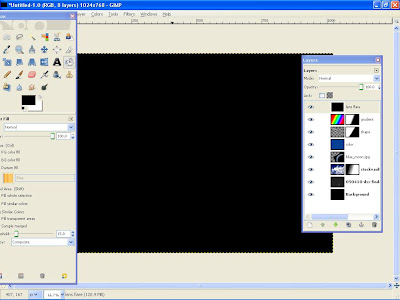
Create a new layer and fill it with black.

After that go to Filters > Light and Shadows> Lens Flare.


Change the blend mode to Dodge.

You will notice that the layer is too bright, there is too much gray. So go to Color>Levels. Then just change the Input Levels to 50, 1, 255. Click the image to see the value.

STEP 6 ADD SOME DEPTH
Finally, i'll add some depth. Create another layer.Fill it with black.Go to Filters > Light and Shadows > Lighting effect. Use the values in the pictures. Click for larger view.

Then change the layer mode to Overlay and the opacity to 70.

Finish. Here is my final result.

I also included the Xcf file.
Click here to download the Xcf file used for this tutorial


23 Responses to "Beautiful Planet Effect in Gimp Tutorial"
Heya Starlight,
WOOHOO the tutrorial is there.
Greatjob, i will read it over and try to do it in photoshop this weekend. ;)
Greetings,
Stanley (http://graphics-editing.rabbit-forum.net/)
:) thanks for the comment stanley..
awesome! thanks!
Thanks for sharing man :D
Will try soon :D
WOOOOOW......No Comment.....
BRAVO......
i will try it in photoshop
:) thanks all for the comment..
@salmen
looking forward to see the result in photoshop..don't forget to p.m me if the result is out..:D
really cool effects, and your blog's banner rocks
thanks peileppe..:)
Cool tutorial...
And the outcome is AWESOME!!!!
Where do you get these ideas???
I LOVE THIS TUTORIAL....
:) thanks cody..glad u like it..
i was inspired by abduzeedo tutorial called really cool eclipse effect and james white work..:)
The Result:
http://flickr.com/photos/salmen/3099892105/
http://flickr.com/photos/salmen/3100726726/
made in photoshop
Thanks
wow salmen!
that is awesome...you have great skill of photoshop!
:D
Thank you brother....
Awesome tutorial..you rock man..!
This is a nice tutorial, however, I'd like to report a bug. There shouldn't be stars INSIDE of the planet. It should really block the light of stars. But it's a nice tutorial overall. (:
:) thanks for the comment garret.i'll fix the tutorial later..^^
One of the nicer GIMP space tuts I've see. Great work. Gotta love the GIMP;)
Hi, I love the tutorial. Did you include how you got the smokey effect? Because I can't see how you did that...?
@Brian
Thanks for the comment :)
@ SB Red Flag
Thanks. glad u like it.for the smokey effect it is the clouds picture (layer mode = screen ).
WOW, Thanks for you explains!
What for a nice Tutorial!
I have rebuild it and it was easy to do!
Have a nice Day!
Chris
:) welcome..glad you enjoy the tutorial..cheers
I can't find the star picture :( the links are broken.
Thanks for the tutorial!
But the stars picture links are broken. So I do my own starfield with Filters --> Noise --> HSV noise and the values 4/0/0/190. Then I have changed the brightness to hide some parts... It's not the same, but it's mine (^_^)
Post a Comment
Type your comment here, I'll try my best, to reply!