Last week i've done some experiment with 3D text with Gimp..i like my result..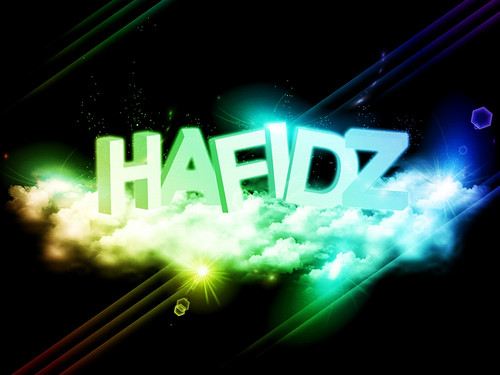
So today i will write a tutorial on how i do the effect. This is my first 3d text effect tutorial..Actually i don't know if wheter people will like this effect but in positive way I called this as my experiment..if u like this tutorial,do leave me some comment. I'll appreciate it..thanks!
See the final result for this tutorial.Click the image for larger view.
Before u do this tutorial:
What u need is a set of 3D text, i use illustrator to make the 3D text (i've made a tutorial how to made the 3D text in illustrator.Click HERE to read it) or maybe u can use Blender or Cinema4D if u have them..If u don't have any of these don't worry because i've included the 3D text file for you to download.Click HERE.
UPDATE!
Another download link for the 3D text if you have problem with rapidshare. Click HERE.
1.Create a new document.then drag the 3d text file into the document. After that create a new layer behind the 3D text layer and merge down.


Fill the background with blackcolour.

Duplicate the 3D text layer and named it as text blur layer.

Create another layer and named it as clouds.Download a clouds brush..I use Javier clouds brush.you can download it HERE....start painting the layer with clouds..

Go to Filters>Blur>Gaussian Blur. For this first layer use 9 pixels for the Horizontal and 9 pixels for the Vertical. Create another layer ( I named it clouds 2 ) and start painting again.


Next steps is create another layer and named it gradient.Using the gardient tools select Full Saturation Spectrum Gradient , 100 for the opacity and Linear for the shape.

Apply the gradient to the layer. Change the layer mod to Overlay. Then select the text blur layer.

Go to Filters>Blur>Gaussian Blur. For this layer i use 20 pixels for the Horizontal and 20 pixels for the Vertical. This will create a soft glow for the text.

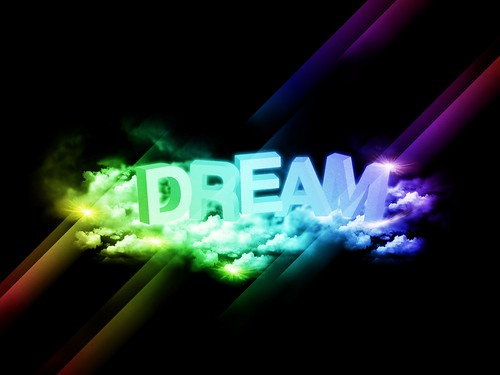
Arrange our layer..i'll put the clouds layer behind my 3D text layer. Click the image for larger view.

Now let's add a paper texture.Download the stock HERE..Put it above the other layer..then change the layer mod to divide and reduce the opacity to 46.3(u can use your own value..)

Create a new layer called Light beam. Use the Rectangle select tool to draw a rectangle.

select the Gradient tool. Pick white colour and choose foreground color to transparent..

Draw gradient across your selection.

You should get like this..Click the image for larger view.

Then select the Rotate tool. Dont forget to tick the 15 degrees box. Then rotate the the light beam layer.

Add layer masks to remove unwanted beams. Then put the light beam layer behind the gradient layer.

Duplicate and place these in between the letters, use your imagination..i like to put the light beam like these..

Next steps is create a new layer and named it as light effect,and fill it with black.

Go to Light and Shadow > Gradient flare. I'll choose Distant sun.Click the image to see my value.


Now go to Colors>Levels. Change the Input Levels to 50, 1, 255.

Then go to Filters >Distort> Polar Coordinates and then apply them to the light effect layer.

Put the gradient flare layer behind the gardient layer.

Duplicate the gradient flare for another light effect.Put it somewhere u like..
delete some parts of the image, do that until you get the result like the image below. ..I'll use eraser tool..i use circle fuzzy( Use big scale, and low the opacity)..

Finish..

Final result

I also included the Xcf file.
Click here to download the Xcf file used for this tutorial


15 Responses to "Gimp Tutorial: Experiment on 3D Text Effect in Gimp"
Nice work man! I really like what you did, keep it up!
thank you gimper..:)
Oh man the tut is out :D
Thanks for sharing :D
Why rapidshare :( Starlight can you up 3Dtext to mediafire or box.net or ... not Rapidshare and megaupload please. I cannot download from these sites :(
i've upload the 3d text file at mediafire..here is the link
http://www.mediafire.com/?sharekey=6bf2edeeb820cafbab1eab3e9fa335caed45af674d67b5df
Work great :D
Thanks :D
Here my result :D
http://i433.photobucket.com/albums/qq57/Amuro-Ray-VV/3dtexteffect.jpg
Or on gimper forum :D
PS: I miss erase some part from light effect layer :(
i like the way u add the floral brush to the 3d text..btw..keep the good job! cheers!
dude, you are the best.
AWESOME!!!!!!!!!!!!!!!!!!!!!!!!!!!
Your amazing at what you do, keep posting tutorials they inspire me in my logo making and Designs.
this tutorial was half assed (the downloading links don't work and it seems that some of the explanation was missing)
I dont get the brush thing...? How do you make a brush from an image?
this really isn't very explained on important parts such as the gradients. great idea though.
I think I may have done something wrong. When I downloaded the 3d text from Mediafire, and dragged it into GIMp, it was already done for me.
Wasn't I only supposed to get the lettering?
thanks, I used blender for the 3d words and used your tutorial of course, very helpful !!!
very great work,sometimes for newbies like me is hard to follow your explanations. Still to be great
Post a Comment
Type your comment here, I'll try my best, to reply!